An RPN Primer
How to use an RPN calculator. If you’ve never used an RPN entry system calculator before, this is the place to start.
What is RPN?
Reverse Polish Notation (RPN) is a way of writing down mathematical sequences, and it’s probably different from what you are used to.
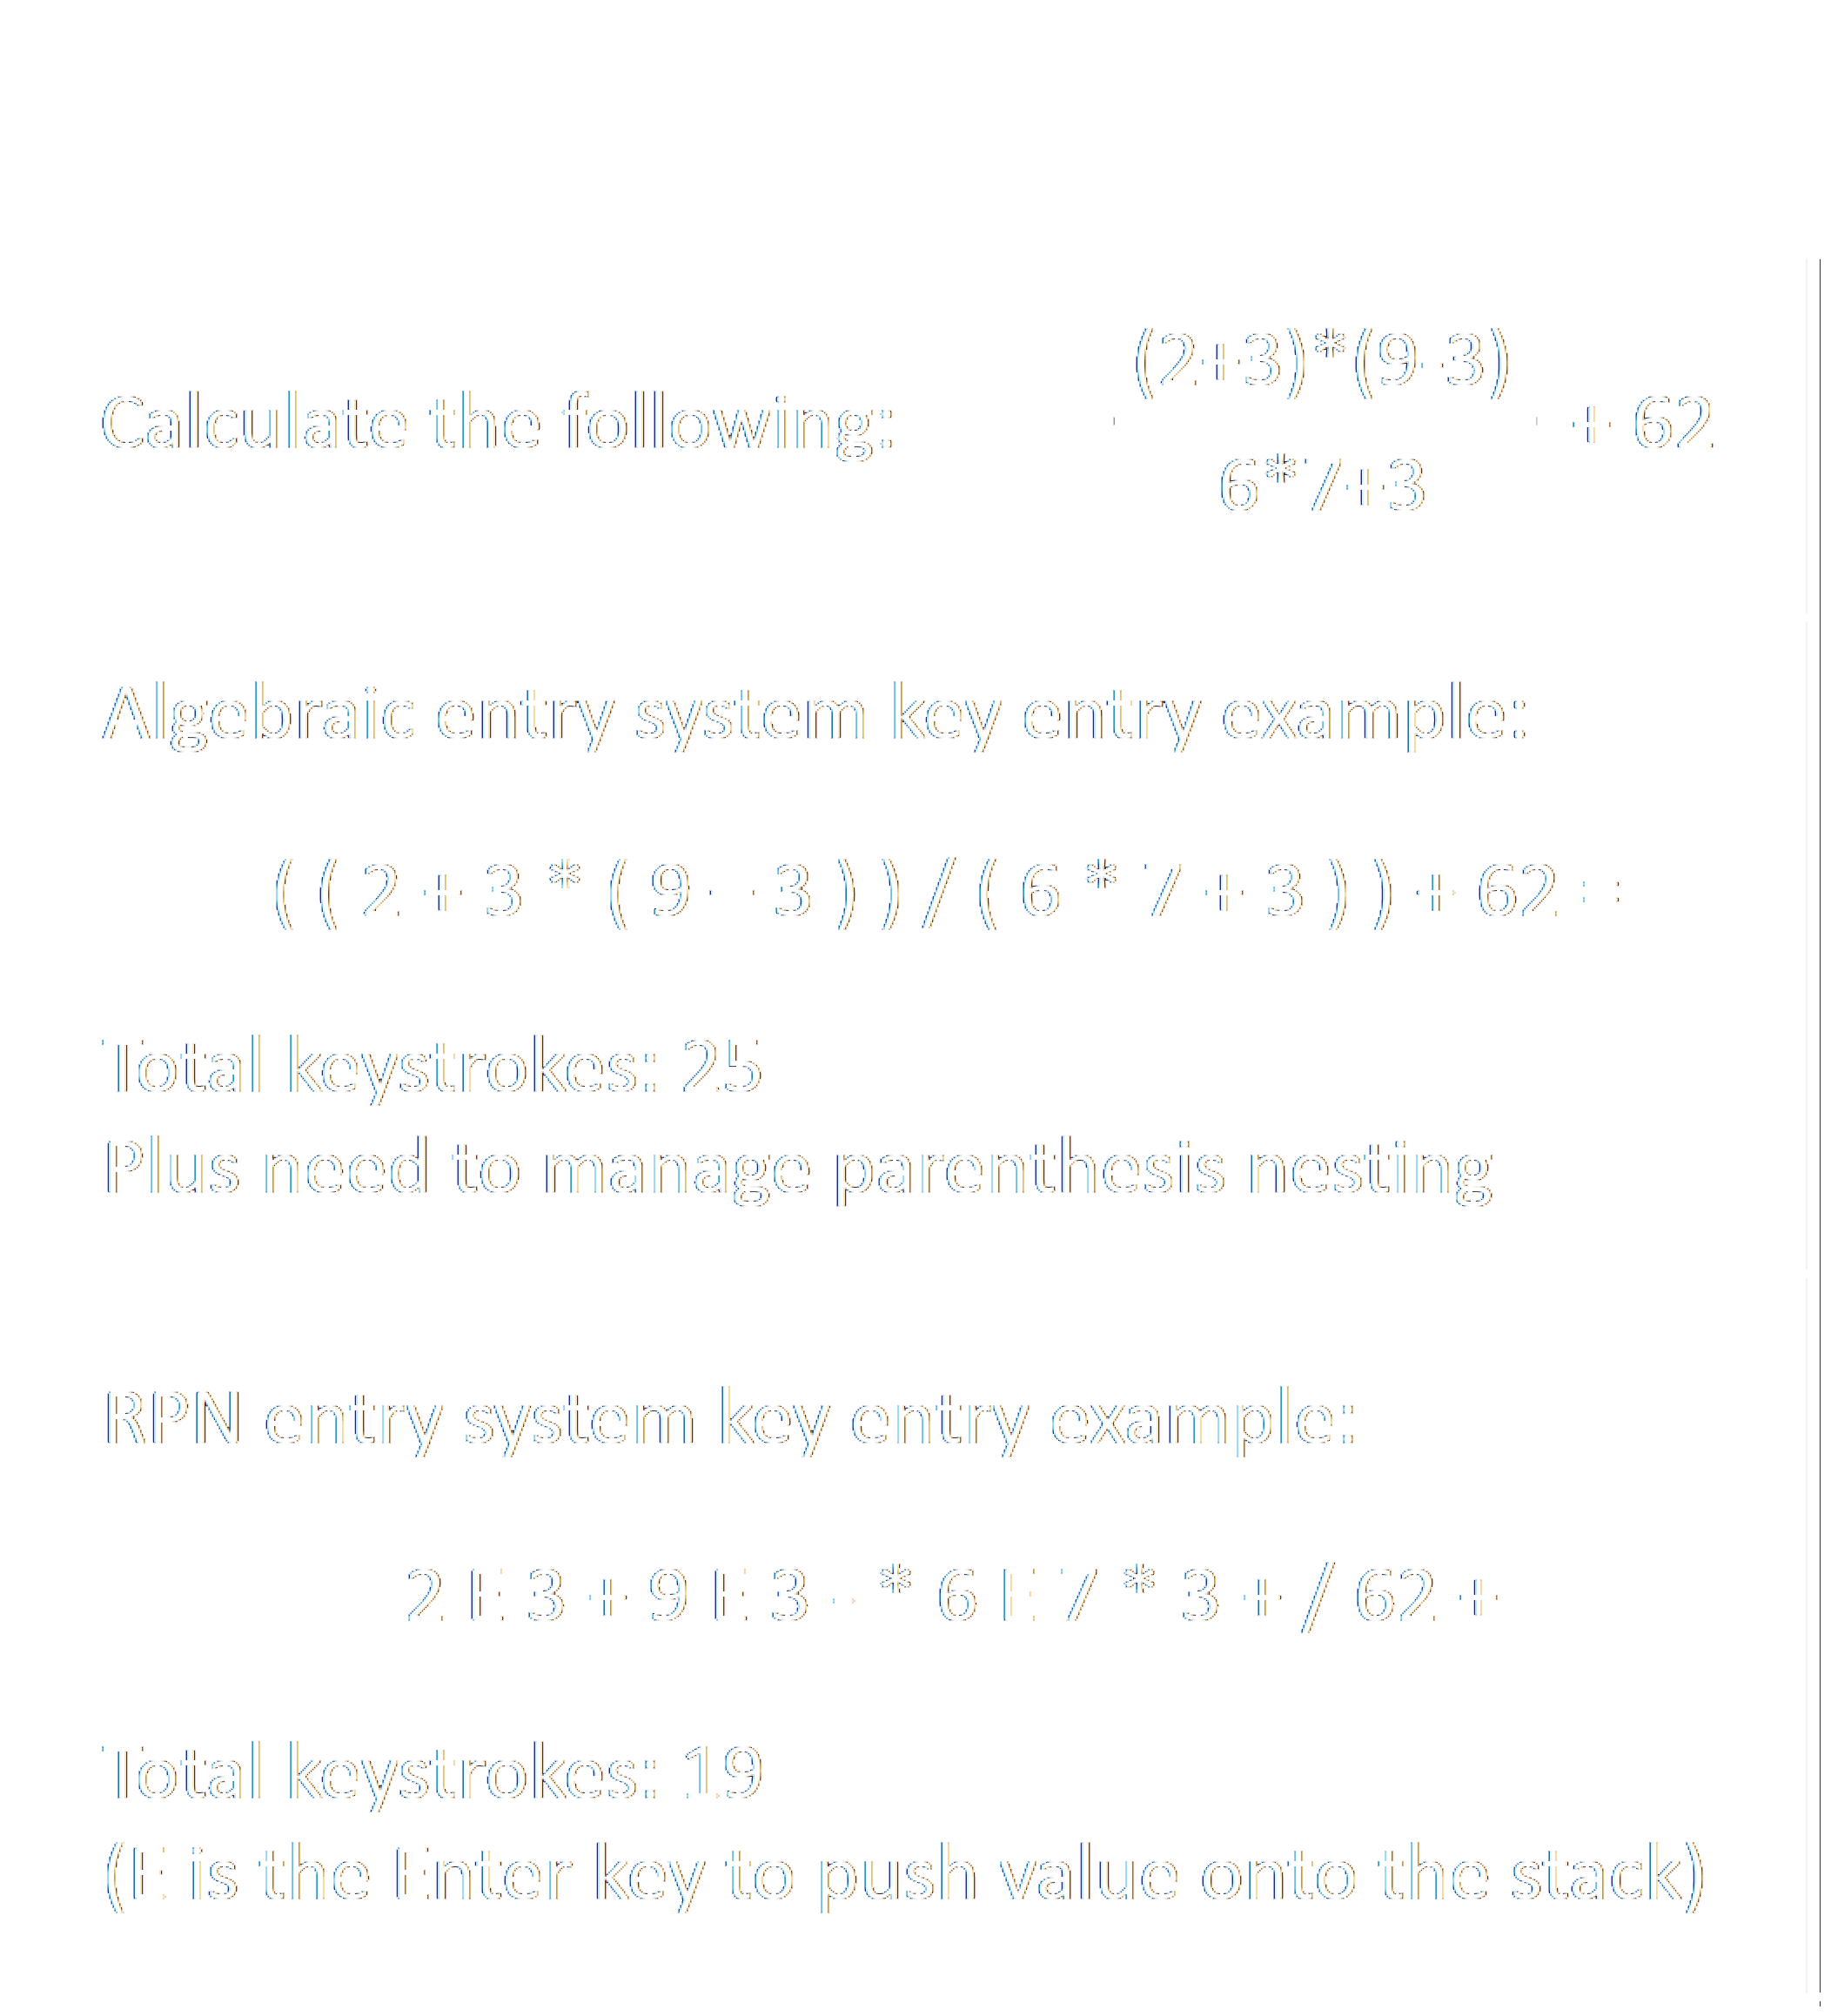
If you think of how you were taught math in school, you generally used something like “6 x 7” to express the product of six and seven, and on a calculator, you would tack on an equals to come up with the result of 42. In this example, notice how the operator (the multiply symbol) is in between the 6 and the 7. That’s called ‘infix’ notation, because the operator is in between. If the expression is more complicated, for example “6 x (3 + 4)” then parentheses are needed to make sure that the expression is evaluated as intended.
In RPN, mathematical expressions are written in ‘postfix’ notation, where the operator is placed at the end. For example, RPN would express the product of 6 and 7 as ” 6 7 x “. As it turns out, with RPN you can express any arithmetic calculation, no matter how complex, without ever needing parentheses or brackets. The other example above, written in RPN is “3 4 + 6 x”. This is saying that the sum of 3 and 4 is calculated first, then the result is multiplied by 6.
RPN has a practical application for calculators. It is also something you should seriously consider learning if you are a science or engineering student at university, or even as a general life skill. See the benefits of RPN below for why.
The history of RPN
RPN has its roots in the work of the logician and philosopher Jan Łukasiewicz, who lived in the early 20th century. He invented the Polish notation (named after his nationality) around 1920. This was a prefix notation where operators were placed at the beginning of the expression, and was intended for use in logic, arithmetic and algebra. In this prefix notation, our sum of 6 and 7 becomes “+ 6 7”.
Reverse Polish notation was proposed in the late 1950s and early 1960s as a modification that would make the scheme easy to implement on computers. With a prefix notation, the computer would have to remember the entire set of operators and operands, and only evaluate it once it was complete. But by changing the notation from a prefix to a postfix notation (“reversing it”), each time an operator is encountered it can be executed immediately, creating a temporary result. This fit very naturally with the idea of a memory “stack” used to hold both the operands and the temporary results. Thus reverse Polish notation, or RPN, was born.
RPN was popularized in the 1970s and 1980s with Hewlett Packard (HP) calculators, including the 9100A, the HP-35, HP-15c scientific calculator, and the HP-12c financial calculator (which, although over 30 years old, is still manufactured and sold today by HP!) These calculators used RPN as the entry system. For quite a few years, nerds would argue about which calculator system was best – algebraic entry, or RPN entry.
As computers and handheld devices became more popular, RPN saw a slow decline in use. Most calculators and calculator apps today use an Algebraic entry system, which matches typical math training in high school. It is however still possible to purchase RPN calculators, or calculators with dual-mode capability.
What are the benefits of RPN
If you are a University student in the sciences or in engineering, you should consider learning RPN and investing in a good RPN calculator. It has several advantages over algebraic entry calculators:
- Shorter calculations. For complex calculations, fewer keystrokes are needed with RPN than on an Algebraic entry calculator. The difference can be as much as 20%. In a university setting, it means you finish exams faster.
- Less error prone. Studies on RPN have shown that it is less prone to making calculation mistakes.
- Less complex. RPN reduces the ‘cognitive load’ on the user, because it’s much easier to keep track of where you are in a calculation. There are no parentheses nesting levels to remember. It’s easier to evaluate more complicated expressions.
- Less chance of someone borrowing your calculator. Just try it! Someone asks to borrow your calculator, and the very first question they ask is “where is the equals key?” They’ll never ask again (unless they are an RPN aficionado themselves!)
For University, this can translate into better grades. In the working world, it just means you save time – which today is one of the most valuable things around.
Side note: I bought my HP-15c back in 1984 when I was in University, and I still have it today. You can still find the HP-15c on eBay for upwards of $500. But since the iPhone came out, a desire to always have an RPN calculator with me resulted in my creating an RPN calculator app for iOS.
How does RPN work?
Calculators that use an RPN entry system have a set of memory registers called the stack, plus a few command buttons to manipulate the values on the stack. The memories are thought of as if the numbers were stacked on top of one another, so that there is a top number in the stack and a bottom number. Buttons allow the user to push a number into a stack register, move the values up or down, and perform operations (like add, subtract, multiply, divide) on the values stored in the stack. This is described in much more detail in the next section.
Most RPN calculators use a stack with four registers – which are usually named X, Y, Z, and T, with X at the bottom and T at the top. Some modifications have occurred over the years to use an unlimited stack, or a stack with a different number of registers. Most of the time, four registers is enough to calculate an arbitrarily complex expression without the need to resort to memories.
In the next section, we dive into precisely how the stack works for an RPN calculator, and we’ll be using this four position stack idea to demonstrate the operations.
How the RPN stack works
Imagine you have four memory locations in the calculator that can hold numbers, and you think of them stacked vertically one on top of the other. We can give these registers names: The bottom one will be “X,” the top one “T,” and the two in the middle are “Y” and “Z.” Since simple calculators only show one number at a time, we define the X register to always be what is shown in the display.
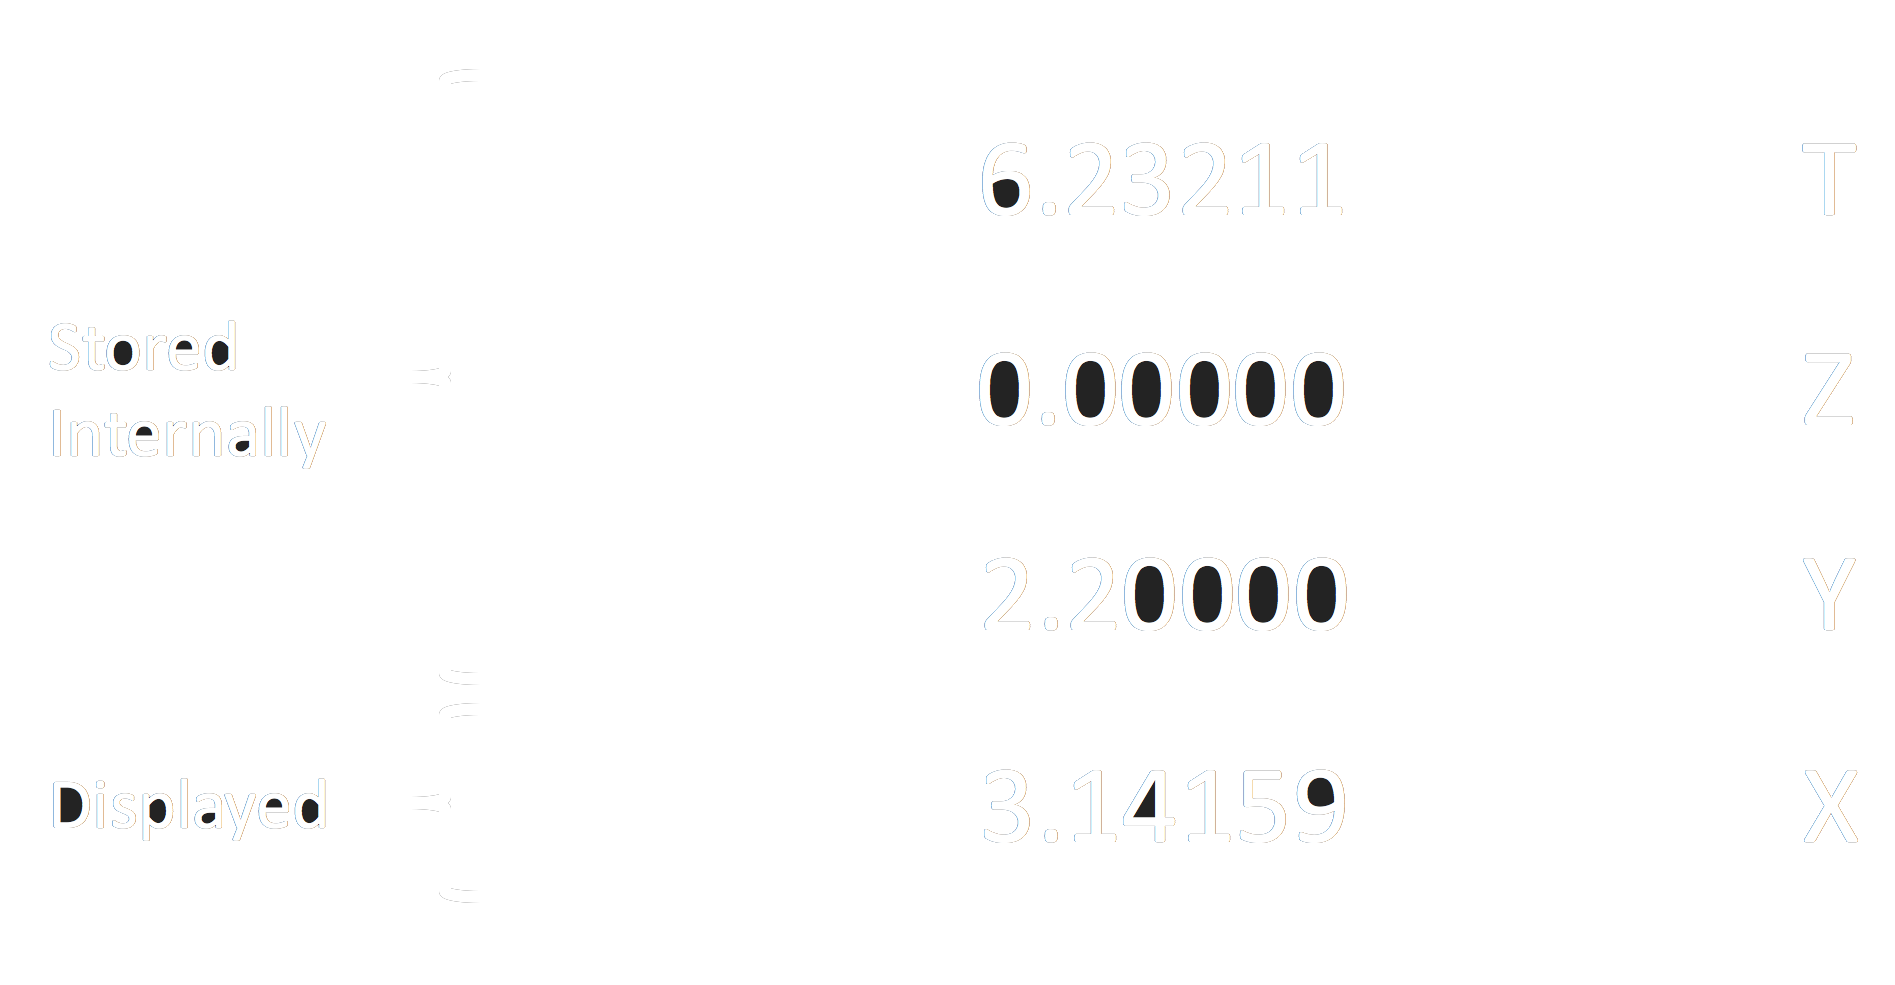
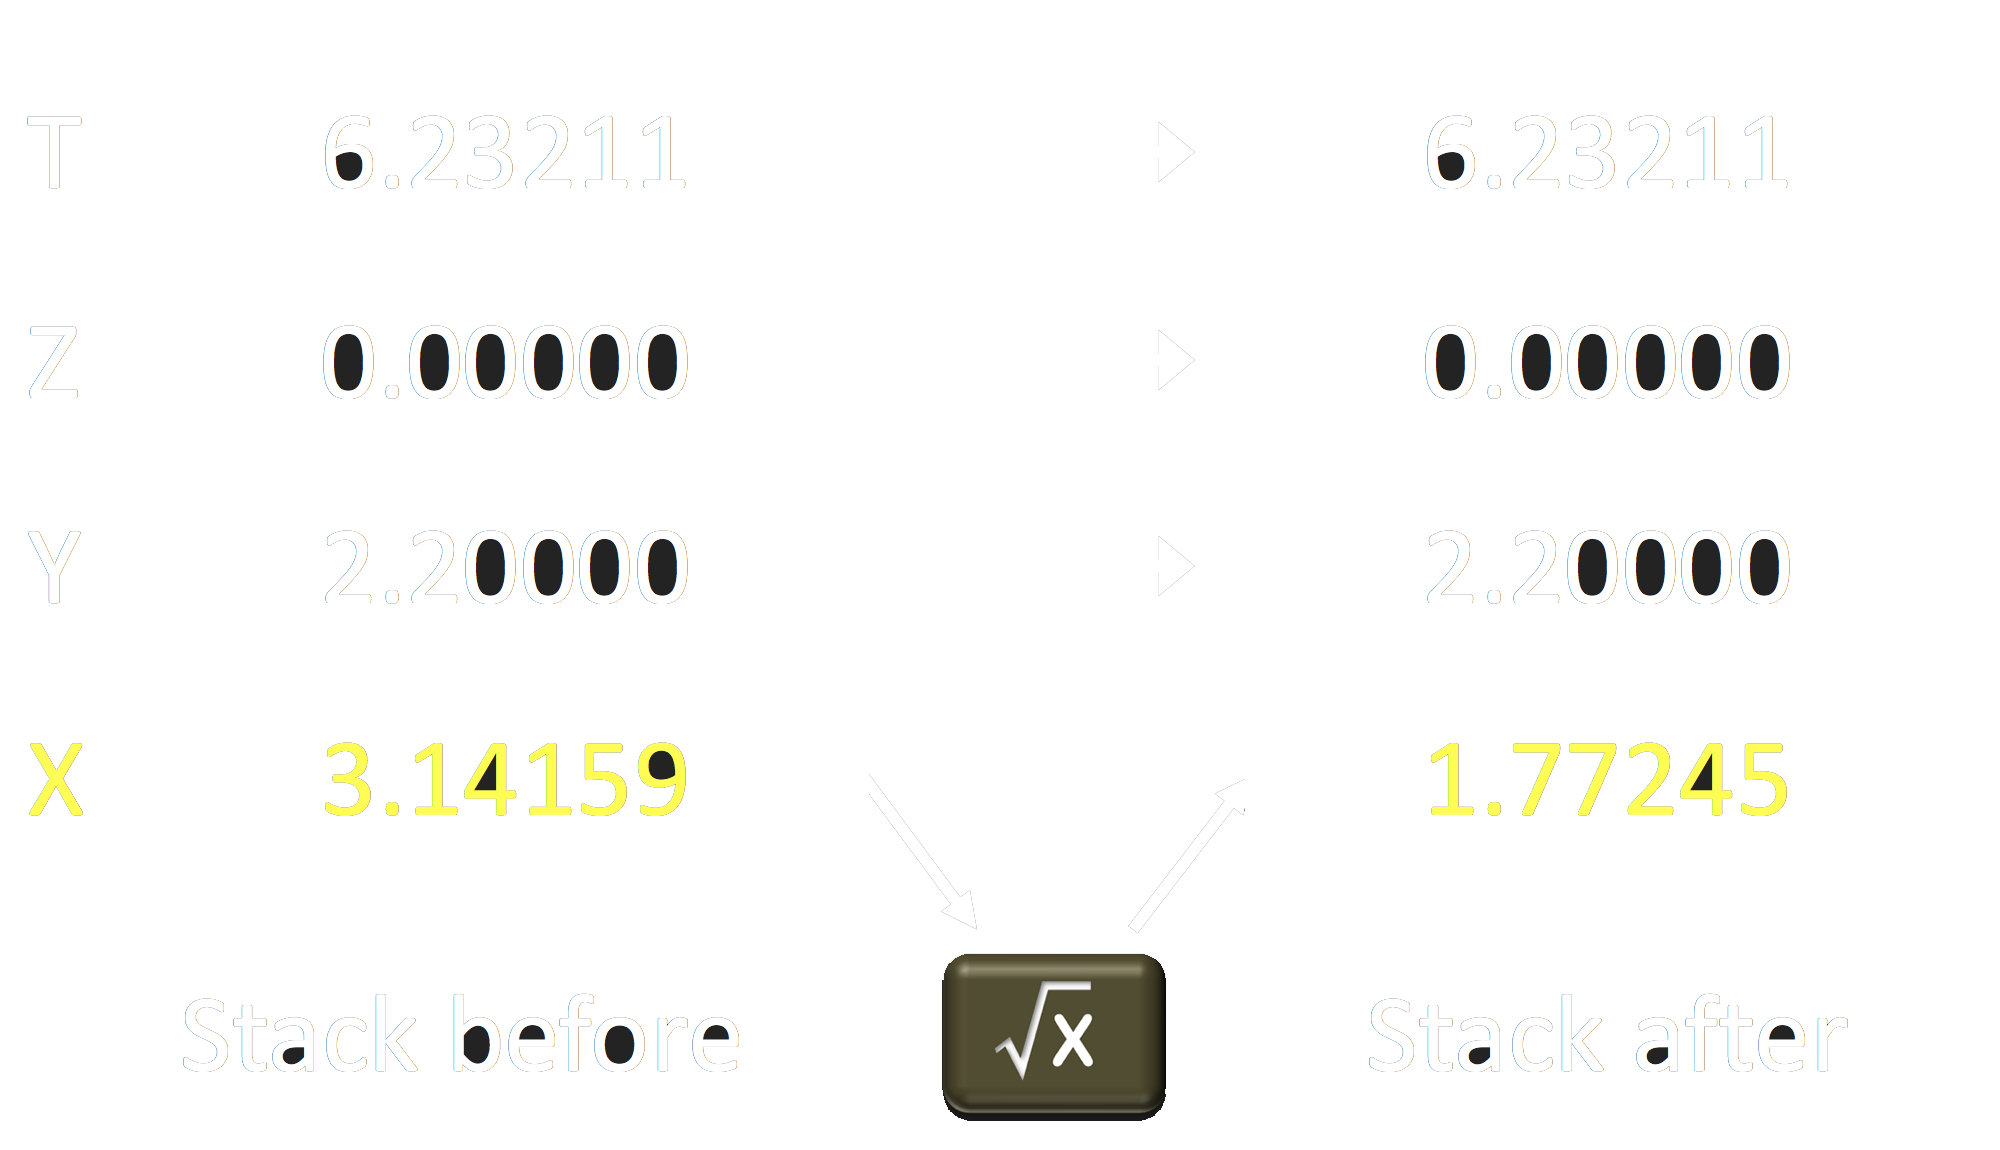
When an RPN calculator performs an operation that requires one number (for example, square root), it takes the bottom item off the stack (from the X register) and replaces that register with the result. The rest of the stack remains in place, so the Y, Z, and T registers don’t change.
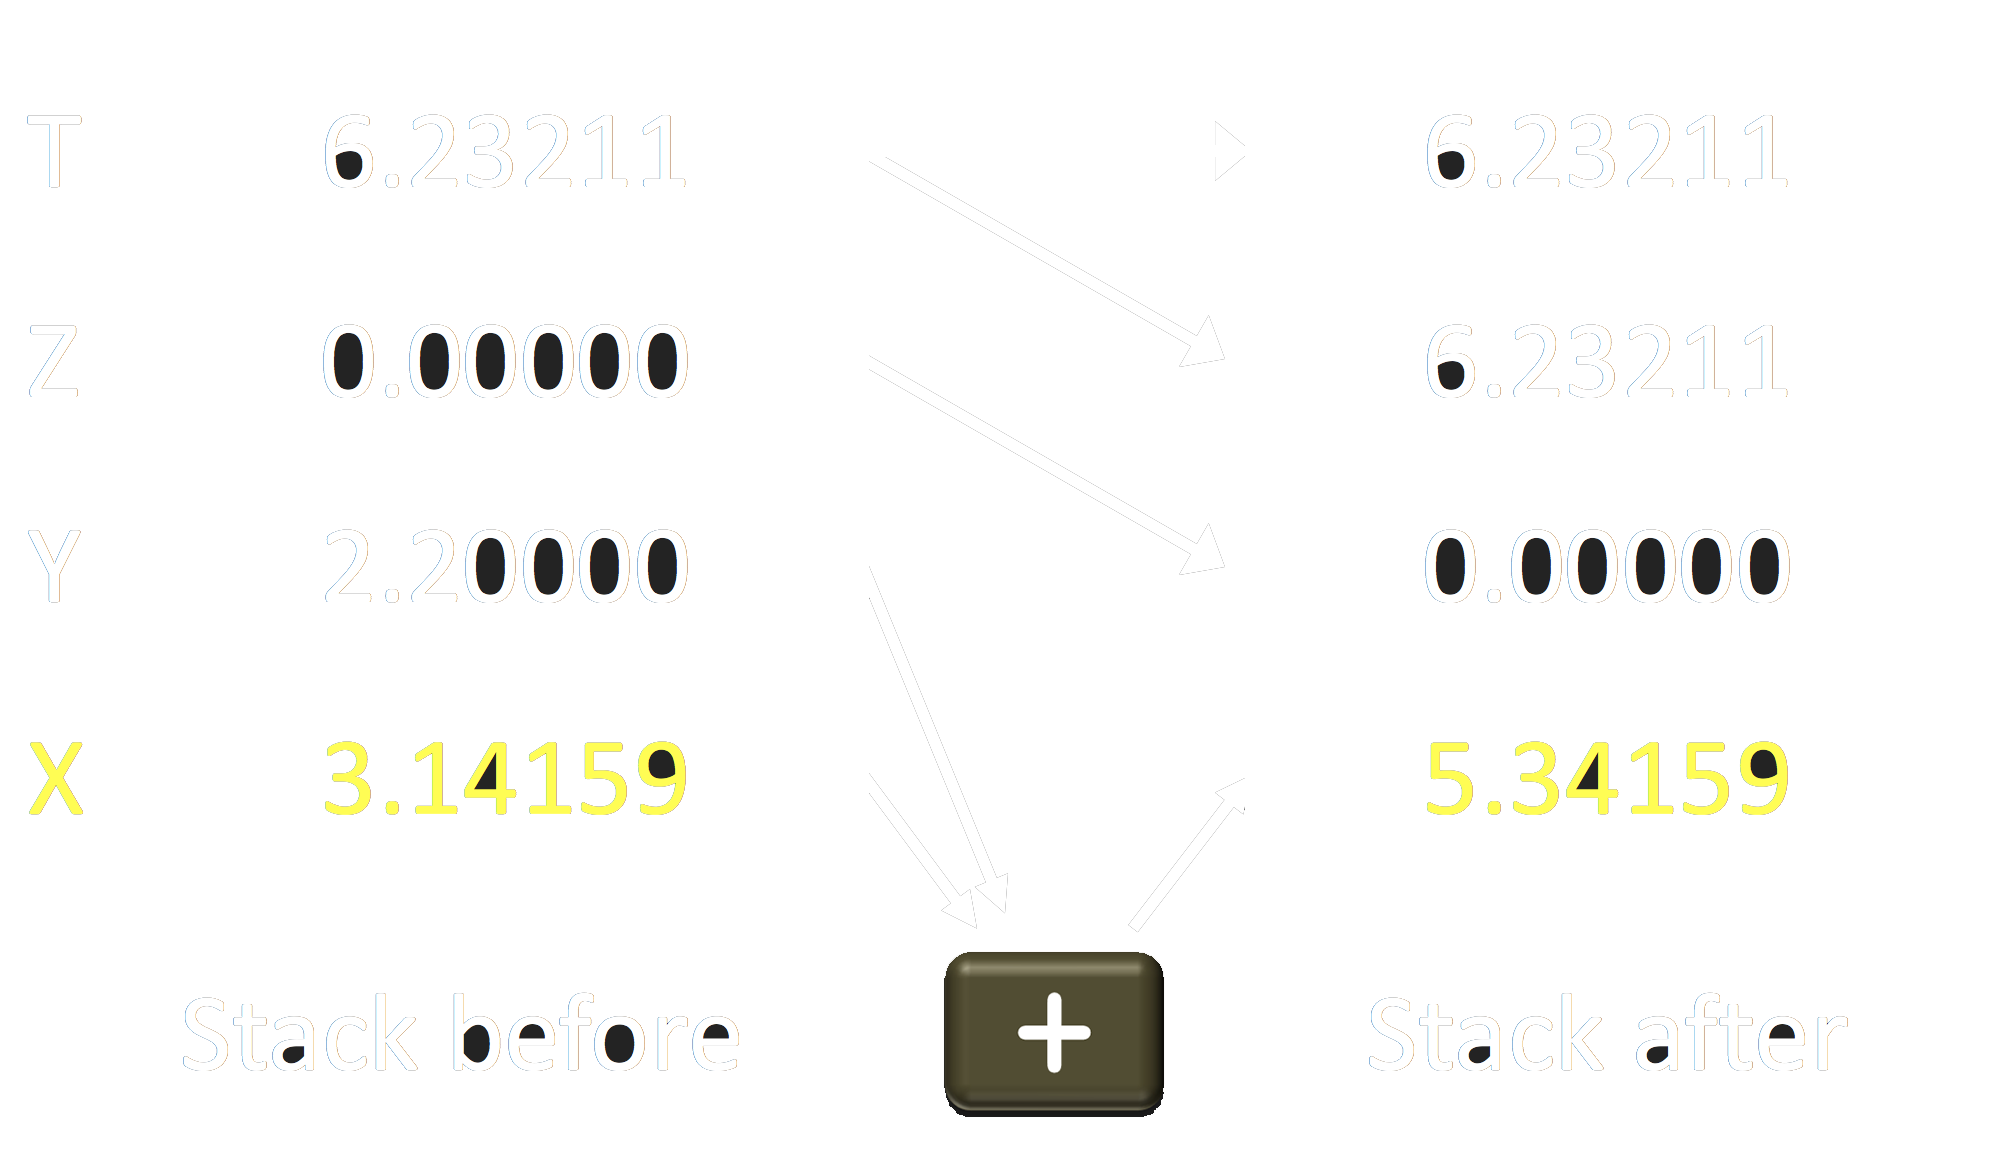
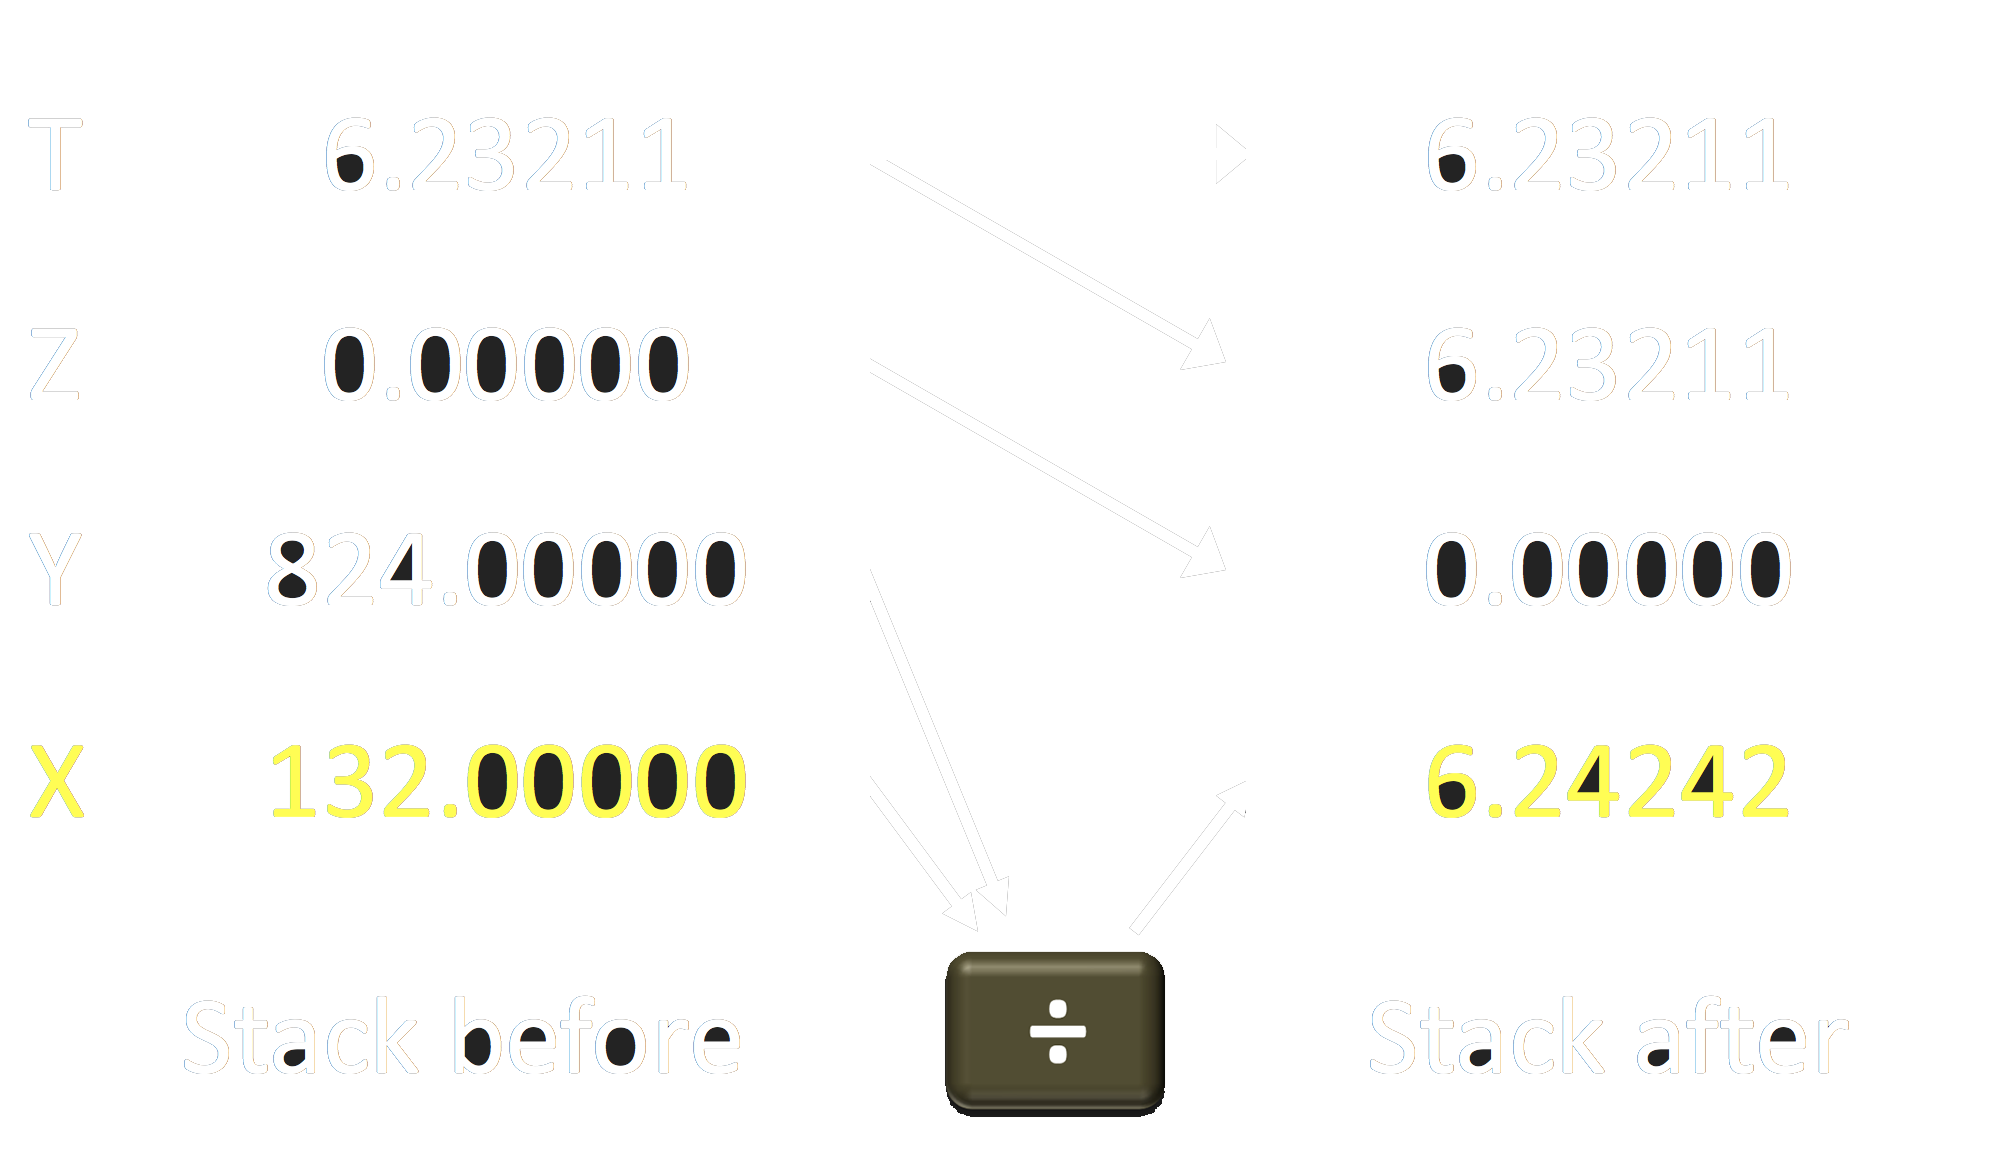
For operations that require two numbers (like addition), it takes the bottom two items off the stack, performs the addition and then puts the result into the X register. However now there is one less value on the stack than there was before, so the values above are dropped down. The contents of Z move into Y, and the contents of T move into Z. And, importantly, the value of T is then duplicated and placed back into T. This is shown below. The X register is in yellow to indicate that it is what the calculator displays at all times.
You may not realize it, but you’ve seen this representation of addition before – where the numbers are presented stacked one above the other. In fact, you’ve seen it for addition, subtraction, multiplication, and division. Take a look at the examples below:
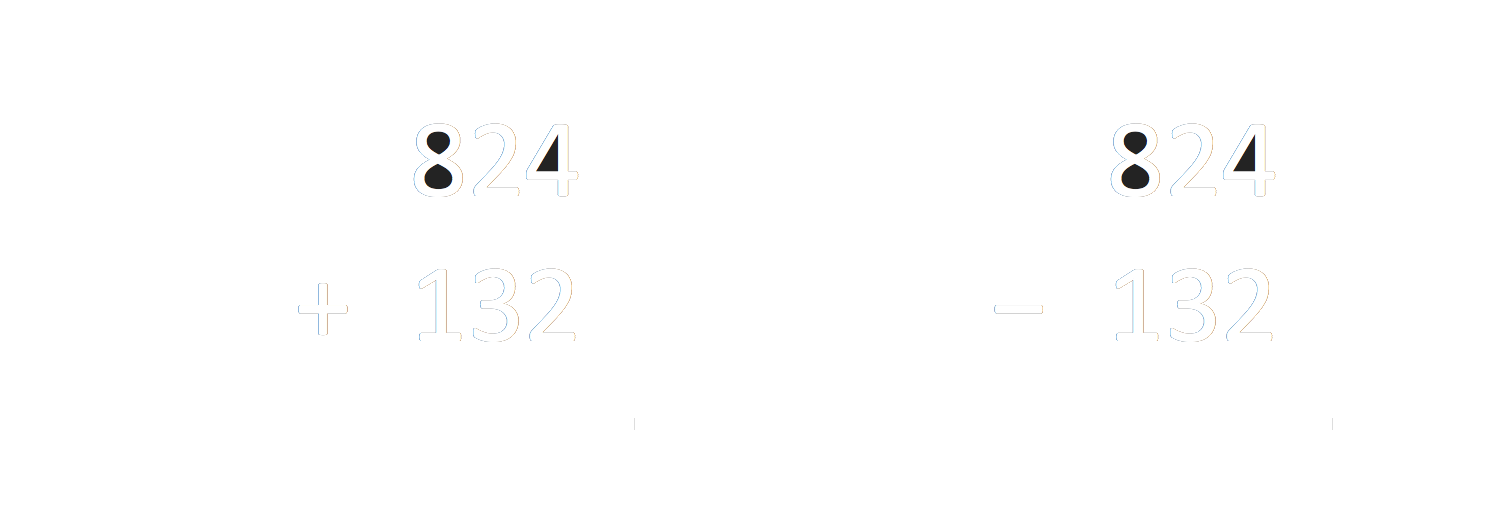
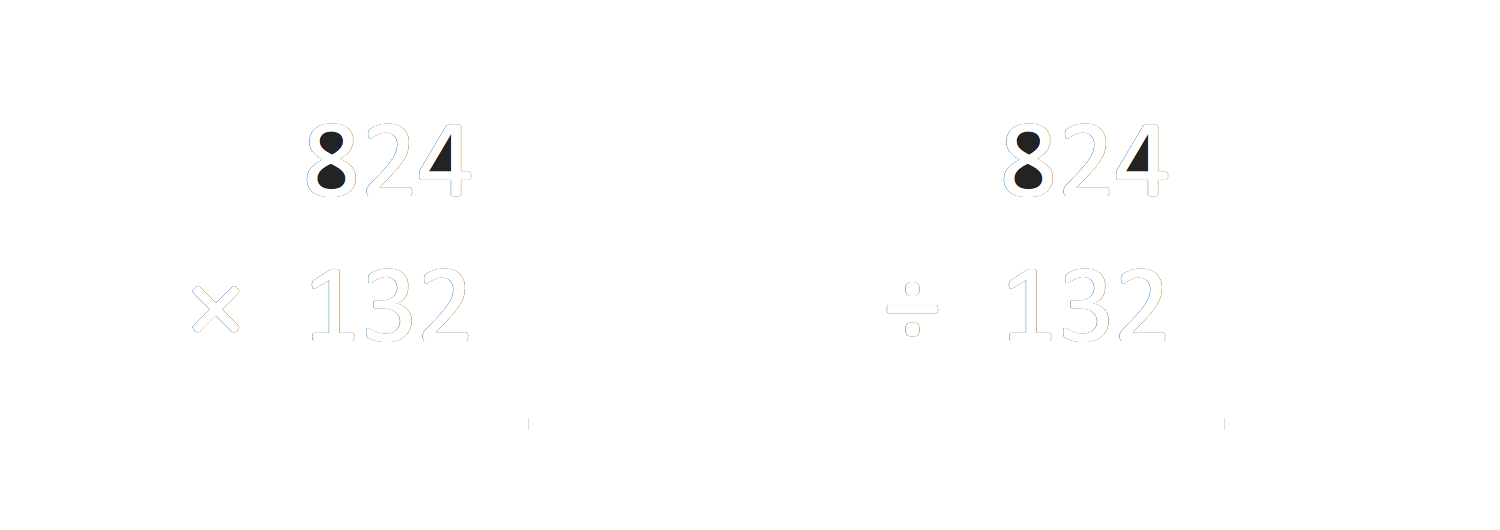
In each case, we have a stack with an operator.
And this is important: RPN works exactly like this for all arithmetic operators. The order of the operands matters for subtraction and division. You can see that for the examples, if we have 824 in the Y register and 132 in the X register, then pressing subtraction will give us 824 – 132. Similarly for division, pressing the divide by key would give us 824 / 132.
What does the RPN Enter key do?
There’s something important missing! How did we get those numbers on the stack in the first place? And what if we need to change the other values on the stack?
RPN calculators provide a few keys for changing what is on the stack, and none is more important than the Enter key. That’s why it is usually twice the size of other keys (or more). It is also the defining characteristic of an RPN calculator – it has no equals key, but it does have this giant “Enter” key.
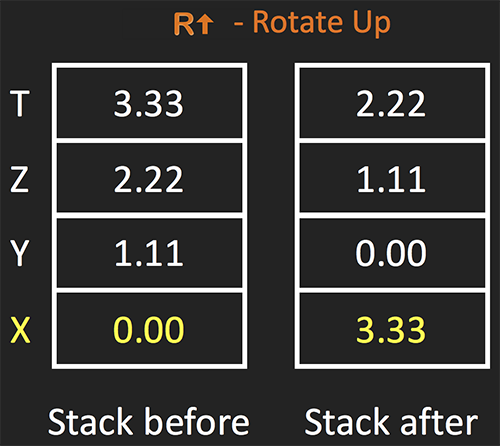
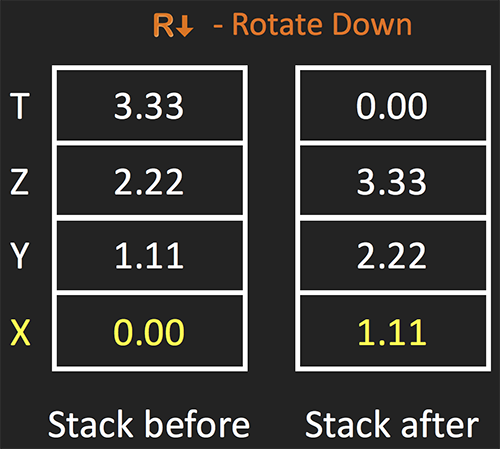
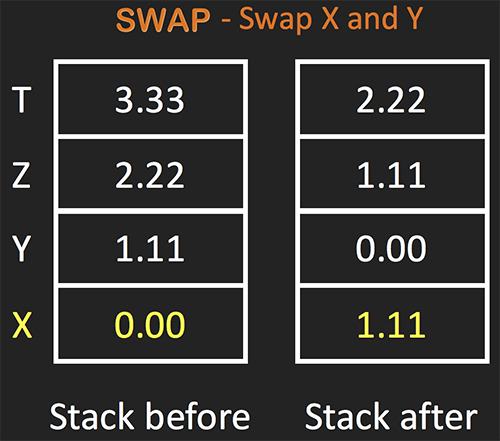
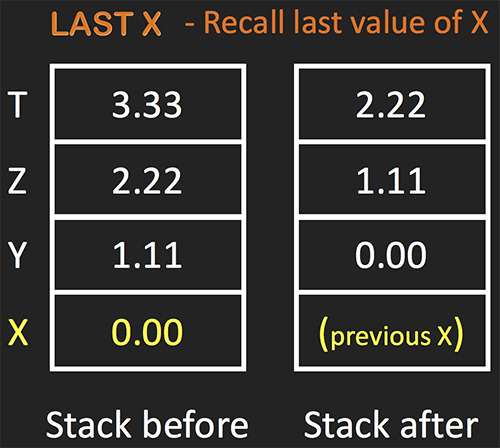
Also shown in the diagram here are four other functions: Rotate Up, Rotate Down, Swap, and Last X. Most RPN calculators have these or some variation.

The purpose of the Enter key is to tell the calculator that you are done entering a number, so that you can enter in another one. So, for example, if I wanted to divide 824 by 132, I would key in 824, then press Enter (which exits entry mode), then key in 132. Finally pressing the divide button would use up both operands, place the result back into the X register (the display), and drop the stack.
The following short video shows this operation using my iOS app on the left and an animated stack on the right. It’s assumed that there are already some values in the stack, so you can see what happens to them.
Side note: SpicyRPN, the calculator app shown on the left, actually uses a 5-position stack and a slightly modified entry approach from typical HP calculators. This doesn’t alter the general concept however.
In my 30 years of using RPN calculators I have sometimes wished that I had just that one more stack position. Also, stack entry as implemented by HP pushes the T register off if you use Enter before a single-operand operator. So I designed SpicyRPN to address these issues.
Other RPN stack operators
The four other stack operators operate on the stack as well. Rotate Up and Rotate Down move the values in the stack either up or down, but instead of the end value being bumped off, it loops around to the other end of the stack. Swap just exchanges the values of the X and Y register. And Last X puts the last value that was previously in the X register back into the X register – for those times when you make a mistake and need to recall the last value that was there.
Now that you’ve got a basic understanding of the stack and how numbers are entered in an RPN calculator, it’s time to start doing some calculations!
How to calculate with RPN – some examples
Here are a few example calculations. In each case the expression being evaluated is shown, and below that an example key sequence that would calculate the result. I’ve included the answer to the expression as well on the right, so you can try these yourself on any RPN calculator.
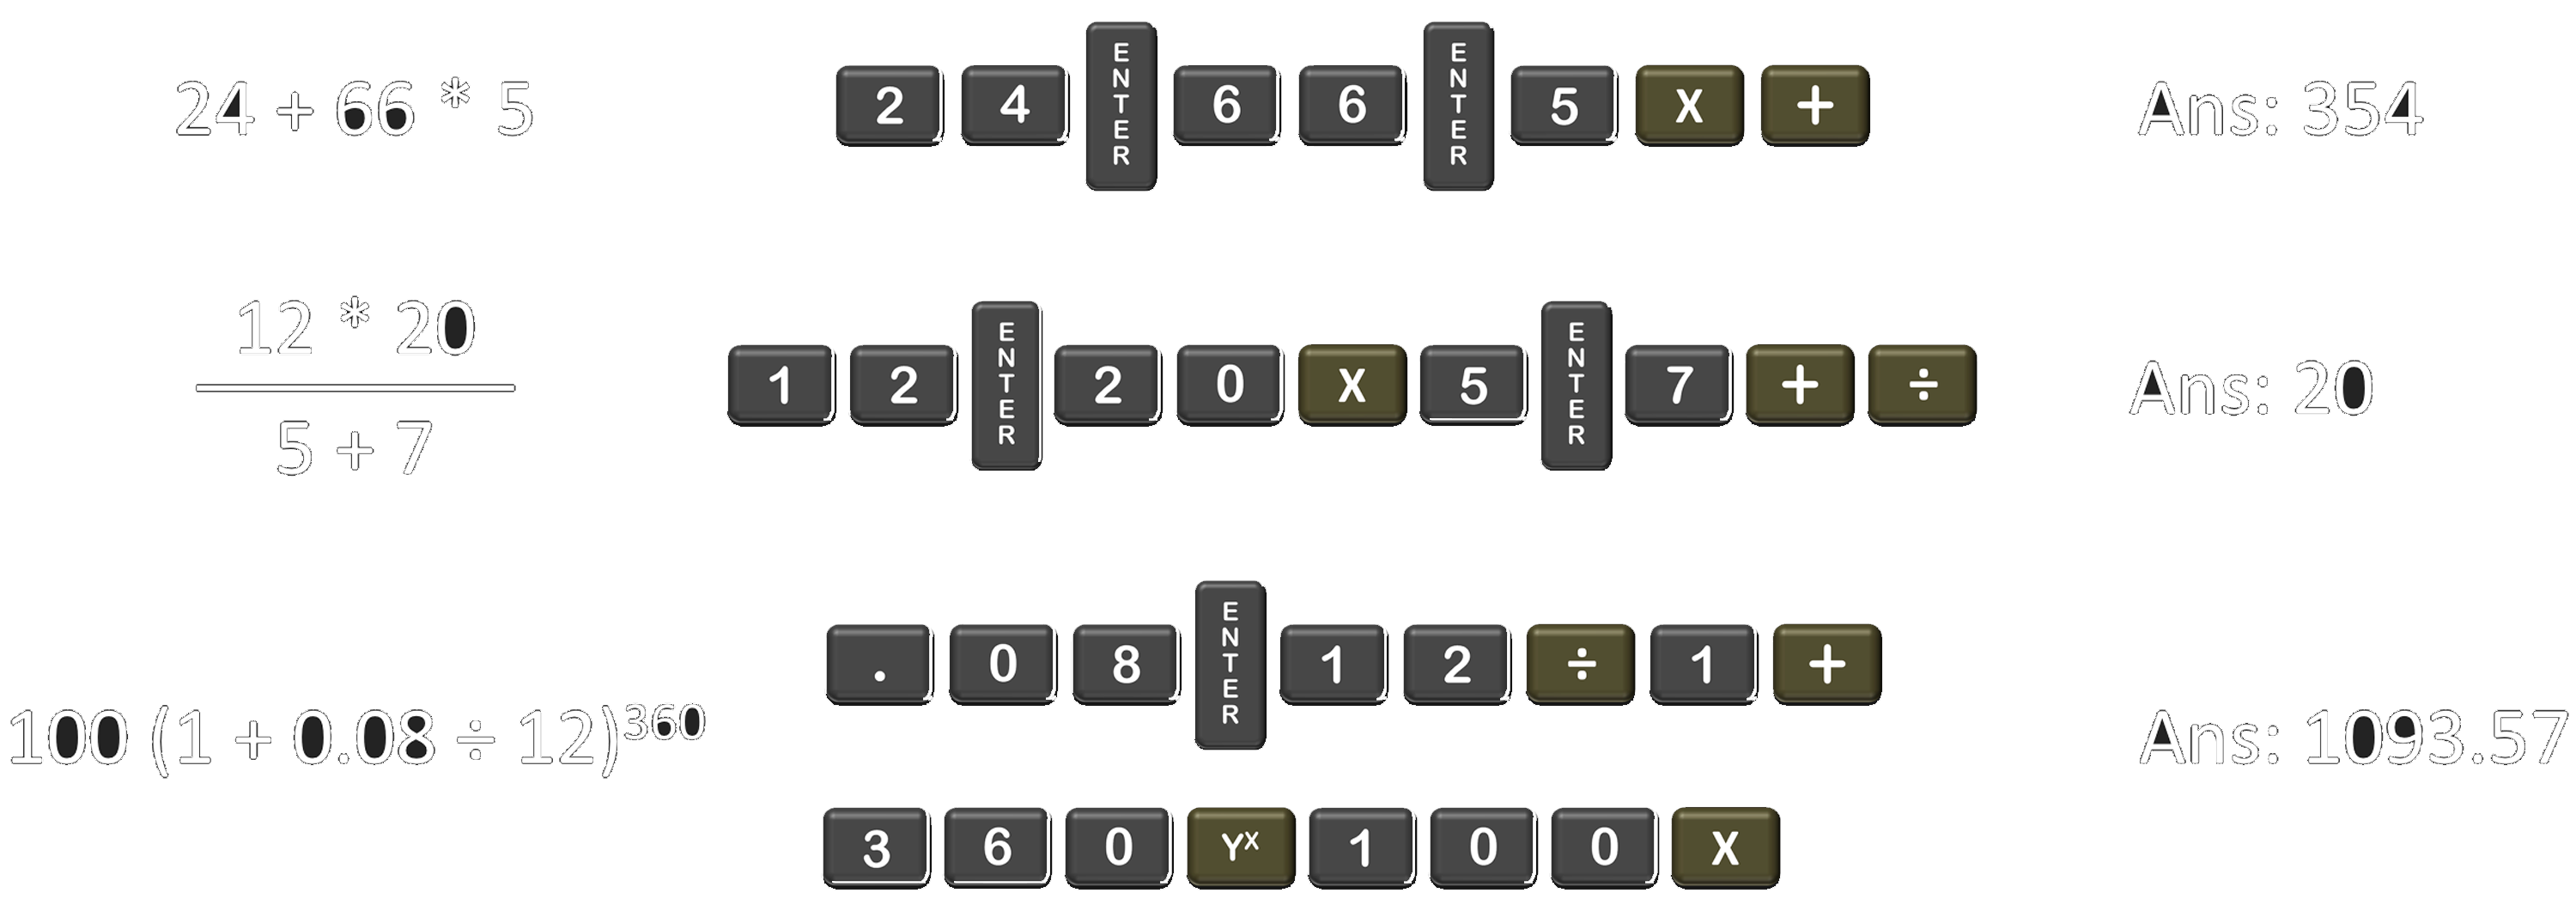
Example 1: In this one, I pushed the three values to the stack, and then executed both operators at the end. Notice how the multiplication must occur before the addition due to the precedence of arithmetic operators.
Example 2: Here, I evaluated the numerator first, and left it on the stack while I evaluated the denominator. Then a divide operation at the end performs the division in the example.
Example 3: This is a compound interest calculation for 100 dollars left in an account over 30 years in an 8% annual interest bearing account. I started with the 8% (0.08), divided by 12 to get the monthly interest, added one, and then took that value to the power of 360. Then I multiplied by 100. Notice here how we work from the inside of the expression outwards, not left to right. This is typical of RPN calculation.
A More Complex Example
Consider the non-trivial example shown. Here we have nested calculations, multiple depths of parentheses in the expression, and a few more complex operators.
This is a complex fraction, because the numerator is itself a fraction. It has some cases where a number is raised to a power, and a square root in the denominator of another fraction. And in the denominator at the bottom there are nested parentheses of calculations.
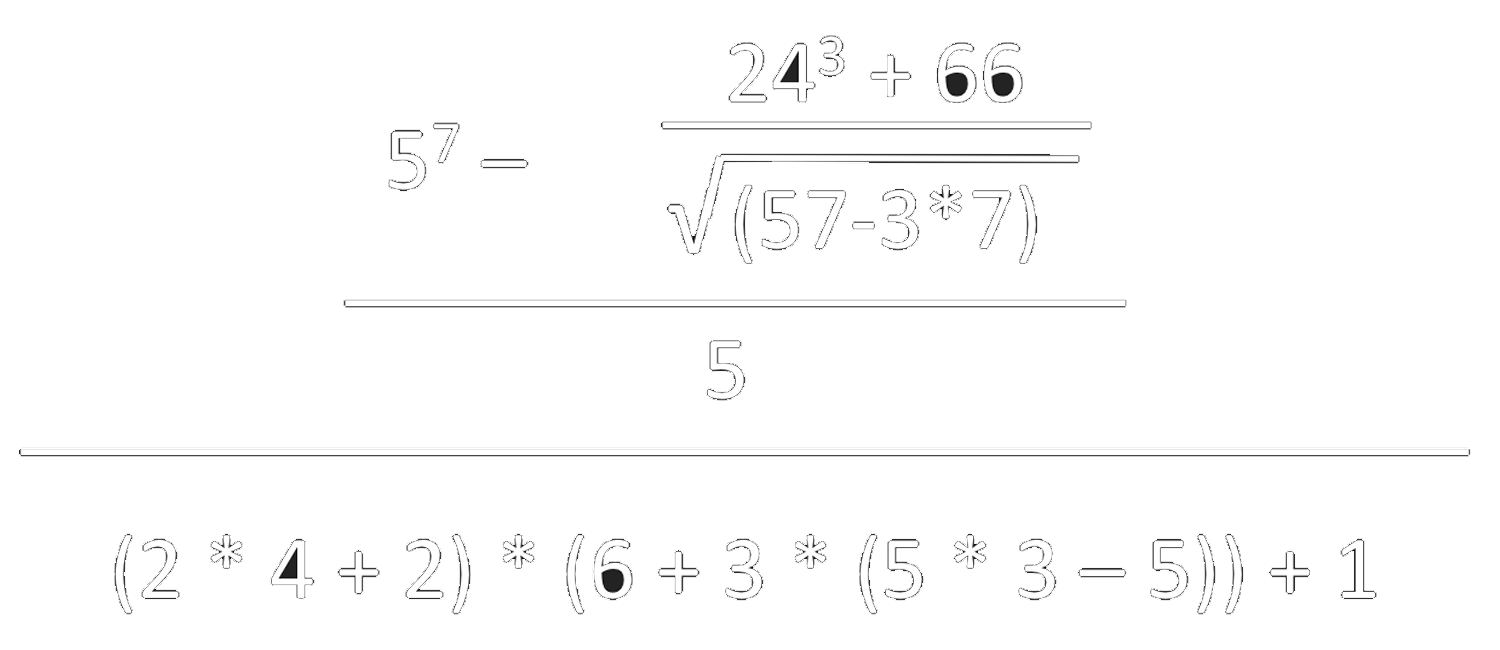
This is a good example showing several practical aspects about using RPN.
- RPN has no need for parentheses – the operations are naturally grouped by the user as you perform the calculations.
- RPN has no need for precedence – but the user must recognize and follow the correct order of operations.
- Work from the inside out – When performing complex calculations, you need to start from the middle and work outwards, keeping in mind the limitations of the stack.
Here is one possible key sequence to calculate the result:
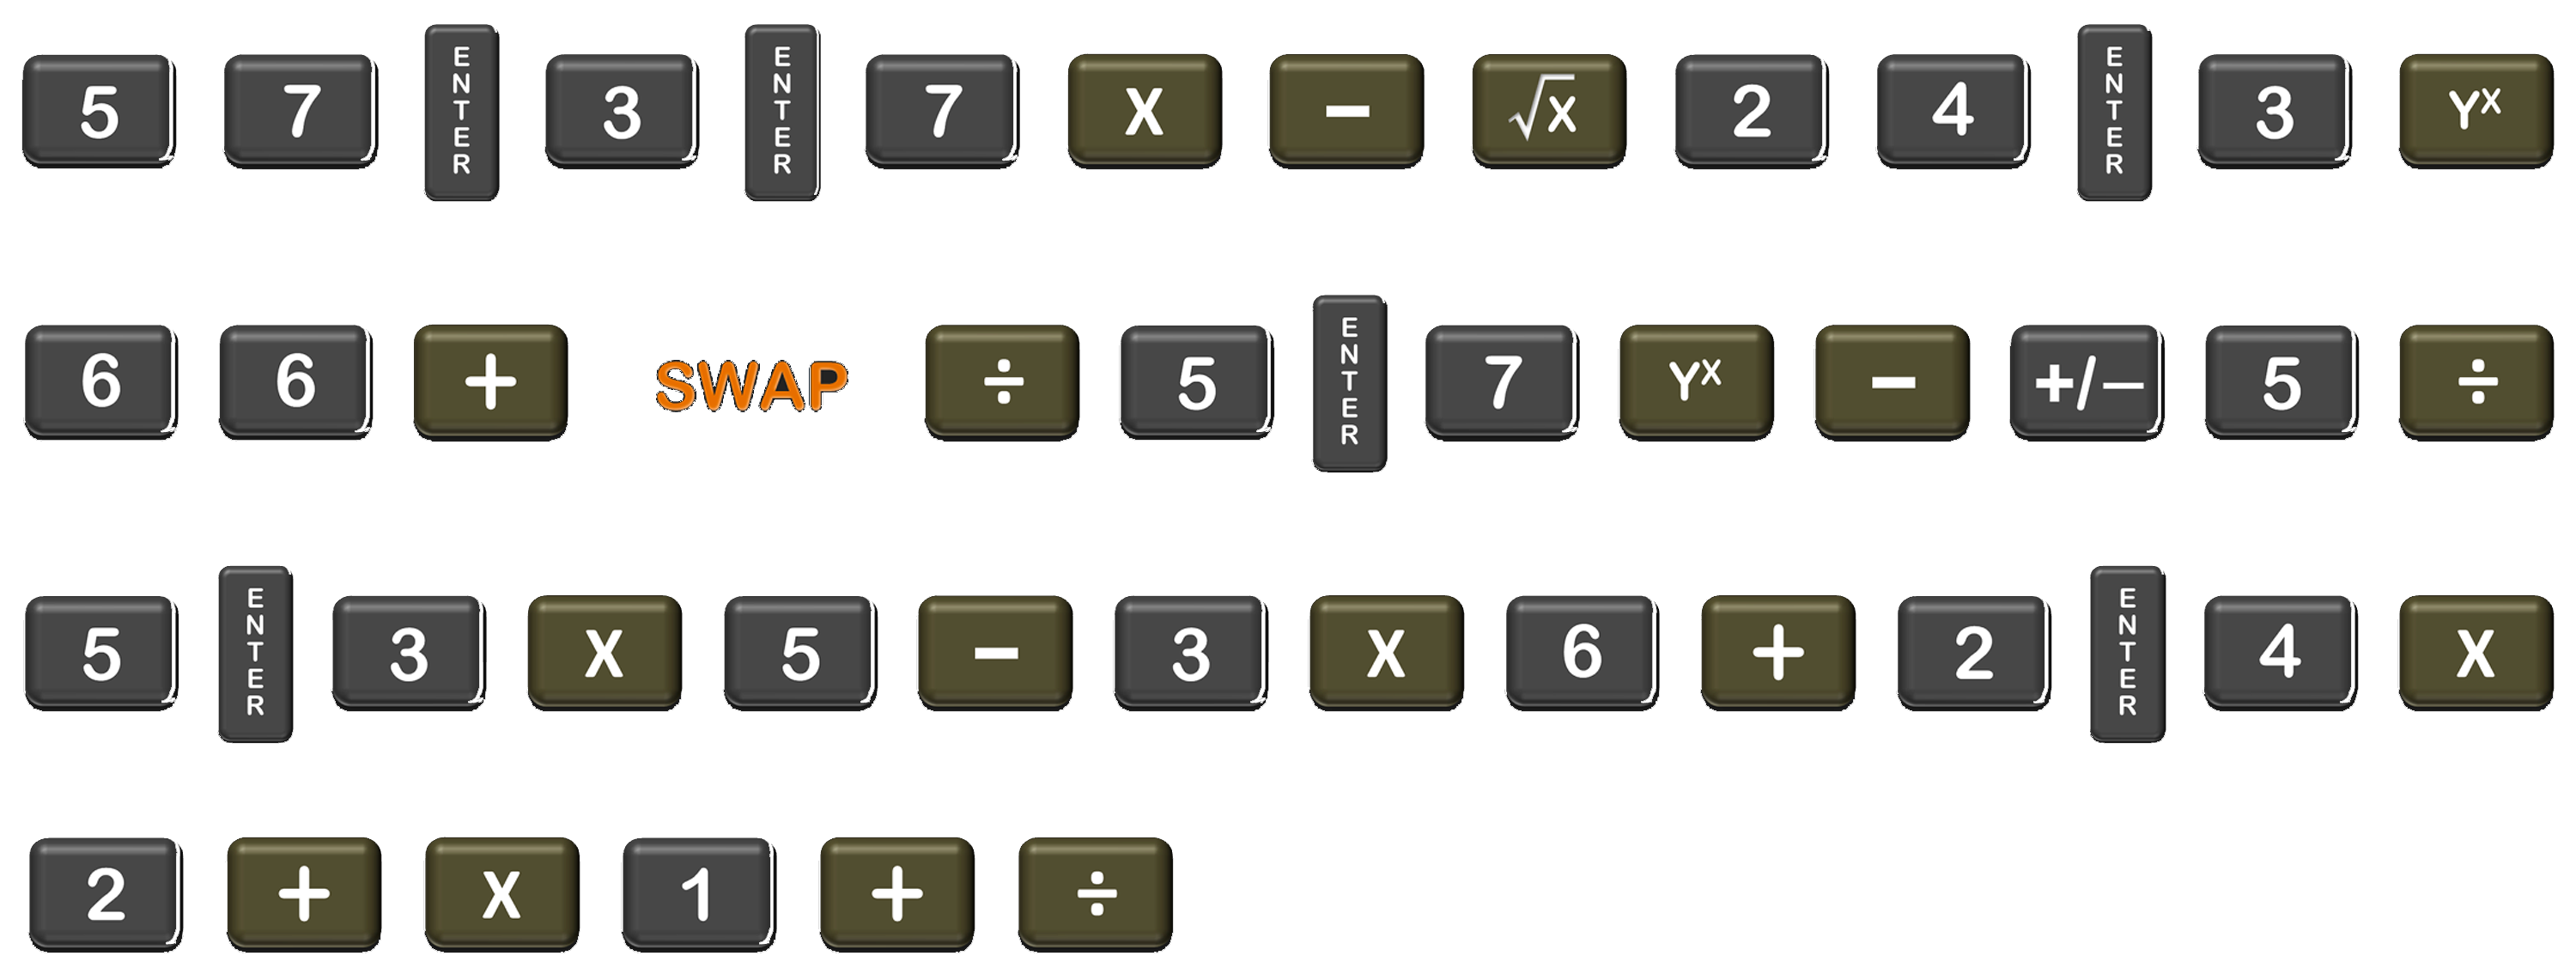
I used 47 keystrokes to evaluate this, and never resorted to using a memory location – this computation required a 4-position stack, but that was enough. Here is the calculation sequence explained in detail:
- Start under the square root, entering the 57 first. Then push 3 and 7 onto the stack, multiply the 3 * 7 then add the 57.
- Take the square root of that, and just leave this result on the stack for now.
- Enter 24, then 3 and press the Y^X function to calculate this power. Then enter the 66 and add it to the result.
- Swap X and Y registers so that the division is in the proper order, and press the divide by key. Leave that on the stack for now.
- Enter 5, then 7, calculate the power, and then subtract (but in the wrong order). Press change sign to fix the subtraction order.
- Enter five and just immediately divide by it. We now have the numerator evaluated.
- Switch to the denominator, and start from the most deeply nested parentheses.
- Enter 5 then 3, multiply it, then enter 5 and subtract that, then enter the 3 to the left to multiply that, then enter the 6 and add it.
- Leave that result on the stack. On the left, enter 2 then 4 and multiply, then 2 and add, and now we can multiply.
- Enter 1 and add that to the result, and finally we hit divide for the big division line in the expression.
To be fair, if I were computing this on an exam, I would do it two or three times using different sequences just to make sure I didn’t make an error. But for the purpose here: if you can completely understand how the sequence above works, then you can get started using an RPN calculator.
The answer, by the way is 42. The video below uses SpicyRPN on an iPad to show this calculation. On the iPad, SpicyRPN displays its entire stack (which happens to have five positions), so you can see exactly what is going on.
Why not an infinite stack?
I’m sure you’re wondering why we don’t just make the stack unlimited. Computers have come a long way since the early 1980s and it seems strange to have such a tight stack limitation.
The reason this might not be desirable is that you can perform nearly any calculation with 4 or 5 stack positions – it’s just unnecessary to have more than that. But more importantly, remember that the T register duplicates itself when the stack is dropped. This means you can put a value in that top register, and re-use it over and over. Each time the stack is dropped, a new copy of that value is placed in the register below it. There is an example of using this in the Tricks and Shortcuts section of this primer.
If the stack is has more positions, this means that the distance between the display and the T register increases, making it difficult or impossible to take advantage of this capability.
Tips and tricks – an Infinite Number Feed
Suppose you wanted to know all the powers of 2. You could calculate each of them, one by one, but there is a much faster way. On any RPN calculator that does not have an infinite or large stack, enter in the number 2, and then press enter 4 or 5 times – as many as it takes to get a ‘2’ into the top register. After that, you can press the multiply key repeatedly. Since the T register duplicates itself each time the stack is dropped, you will get an infinite supply of 2’s, and the results will be 2, 4, 8, 16, 32, 64, etc.
This works for any repeatable calculation. Another example is compound interest. If you have a bank account with 1000.00 in it, that yields 5% interest per year compounded monthly, you could type in the following sequence:

The 1000 represents the starting amount in the account. Each time you press the multiply button, the current amount in the account is shown after one month’s interest has accrued, so the sequence shows the amount in the account after each month has passed
Reversing an Ordered Operation
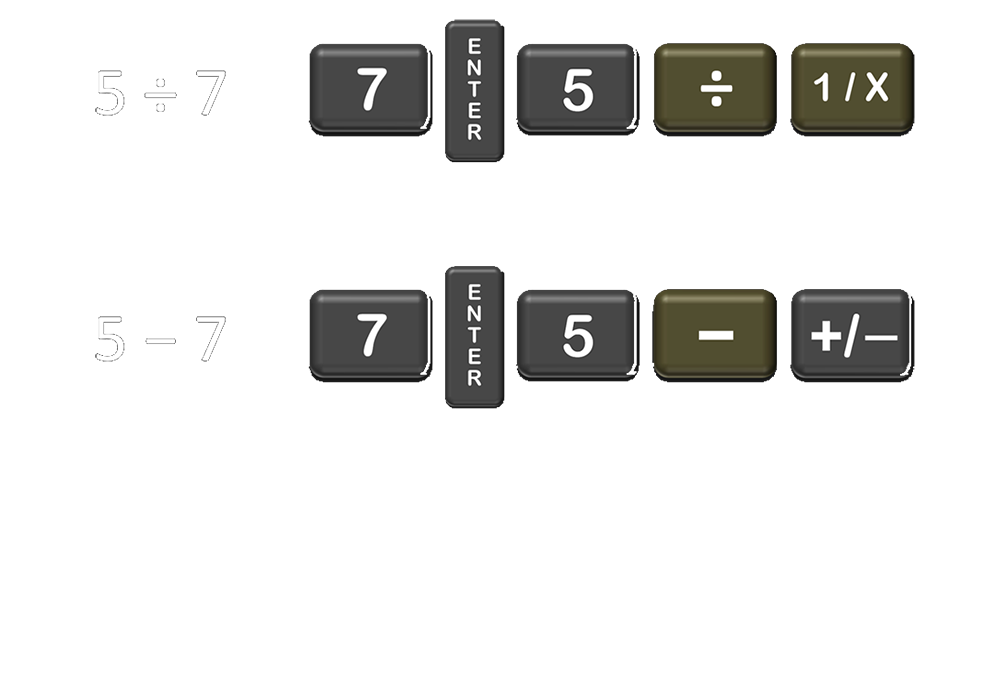
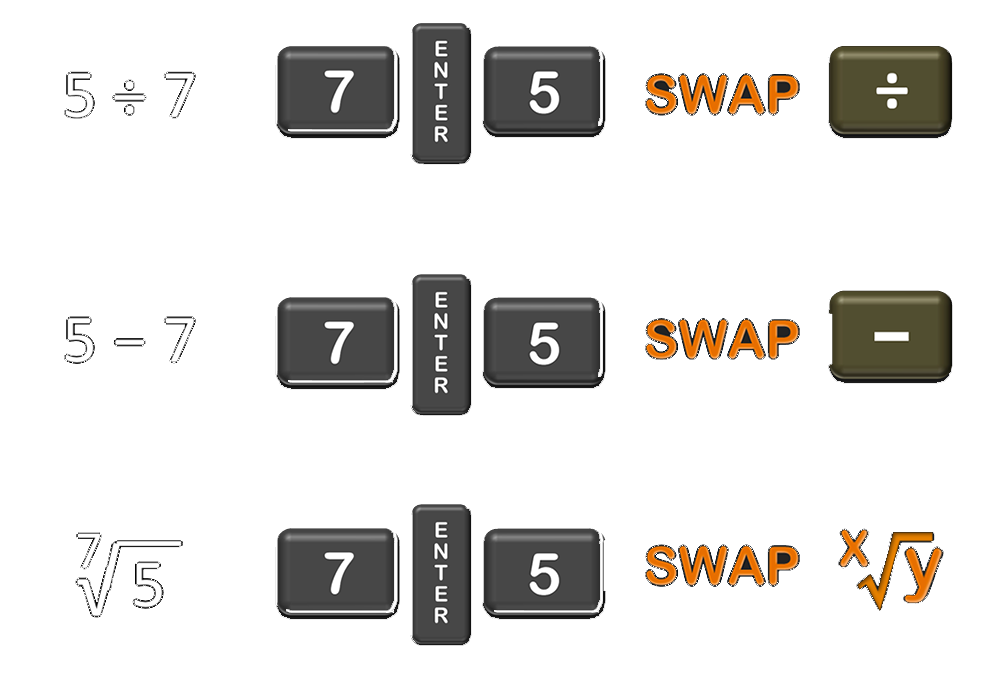
In some of the above examples, the key sequence had operations out of order while working with a complex expression. That is, we had two values that were to be subtracted or divided on the stack, but they were in the wrong order. There are a couple of ways to deal with this.
Method 1: Use the Inverse
For division and subtraction, you can just go ahead and perform the operation, and then use a reversing operation to switch the sense of the operation.
Method 2: Use the SWAP function
Or you can just swap the positions of X and Y, and then perform the function. Note that for some more complicated functions (like X root of Y) this may be your only easy option.
Work from the inside out
This was mentioned above in the examples, so see those cases for illustration. In general you want to work from the middle of the expression out to the edges, where the middle is defined as the most nested set of parentheses. This is because you can calculate the expression requiring fewer stack positions.
Use calculator memories where it makes sense
Although you can calculate nearly any expression with a typical 4-position stack RPN calculator, there are cases where it makes good sense to store a temporary result into a register. This is often the case where you need to calculate some complicated constant and then reuse it for many different calculations. Examples like this appear in science and engineering, as well as in financial calculations.
Conclusion
If you’ve followed along closely, you should be ready to be set loose on your own with RPN. You can investigate various calculators, like the HP Prime (released in 2013), or if you prefer a more retro approach, look for an HP-15c on eBay.
Or you can check out my calculator for iOS devices, but if you are student remember that most exam settings won’t allow phones or iPads – so for those cases you will need an actual calculator.
I hope this RPN primer was helpful for you!
